Online courses are incredibly versatile and can be a powerful tool for a variety of businesses. A blogger could sell courses about cooking, organization, crafting, or interior design. An accounting firm could offer educational programs about budgeting or taxes. An online music store could sell virtual guitar classes in addition to their sheet music and supplies.
The potential and opportunities are endless. And anyone can build and sell online courses thanks to WooCommerce and Sensei Pro.
But no matter the type of course you offer, student engagement is critical. Interested, invested learners complete your courses, sign up for additional ones, leave good reviews, and recommend your business to their friends.
So let’s take a look at some actionable ways you can make your courses more engaging.
1. Break your courses into digestible pieces
Our attention spans aren’t very long. Studies report varying lengths of time, but most agree that the adult attention span falls somewhere around 20 minutes.
You may have enough high-quality, interesting content to create hours worth of curriculum — that’s great! But your students may not be able to fully engage for that long at a time.
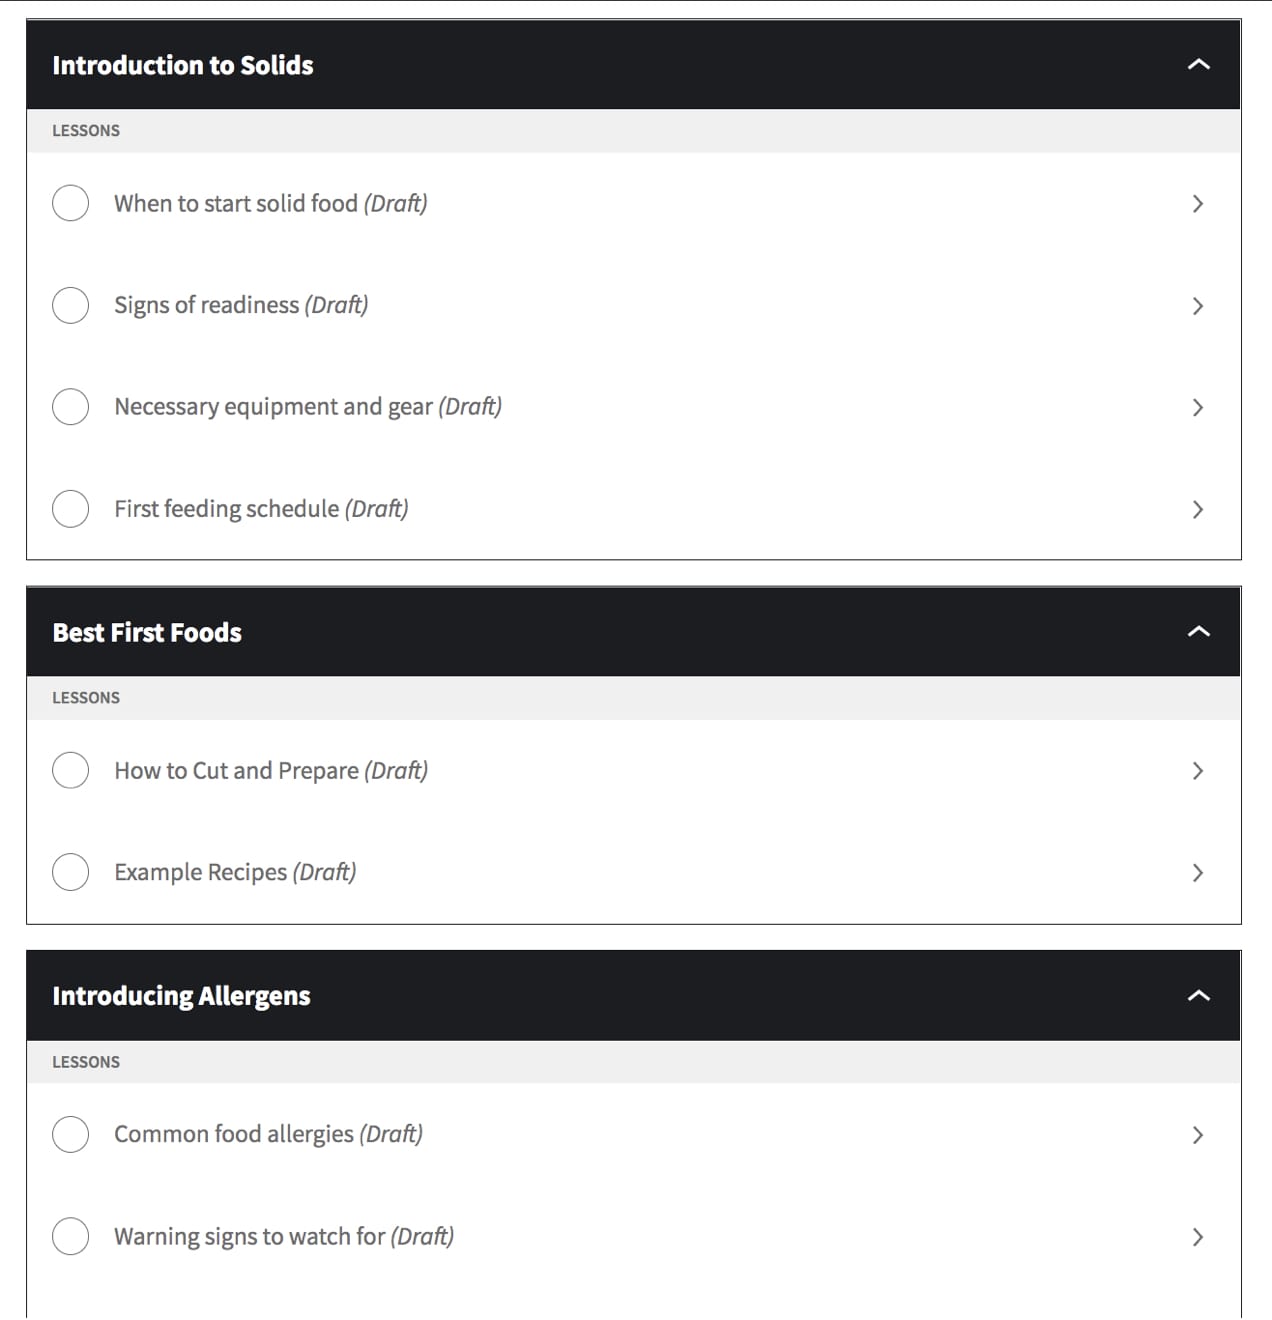
One great way to handle this is by breaking your courses into digestible pieces using categories and sub-categories. For example, if you’re selling a course on starting solids for babies, you might divide it into groups like:
- Introduction to solids
- When to start solid food
- Signs of readiness
- Necessary equipment and gear
- First feeding schedule
- Best first foods
- How to cut and prepare
- Example recipes
- Introducing allergens
- Common food allergens
- Warning signs to watch for
- Tips for serving allergens
Each grouping might contain paragraphs of text, images, videos, and printable resources. Students can finish them at their own pace — whether they want to tackle one at a time or sit down and go through them all at once.
Sensei LMS calls these categories Courses, Modules, and Lessons. You can divide each Course into any number of Modules, then break each Module up into several Lessons.

This makes the navigation process super simple for students, and allows them to quickly see what’s coming up in the course.
2. Create effective graphics
Graphics can be an incredibly powerful way to engage with your students. Approximately 65% of the general population are visual learners, so not only do images add interest to your courses, they can also help convey concepts more effectively.
There are lots of ways to incorporate images into your courses. If you’re listing numerical data, add a chart or graph that represents that information. If you’re comparing the difference between two ingredients, include a photo of them side by side. If you’re discussing a specific type of houseplant, add pictures.
How do you create these graphics? Well, you have several options. While you can always hire a graphic designer to help, you can also take your own photos, create images using software like Canva or Photoshop, or even use stock photos when appropriate.
When creating graphics or choosing photos, keep in mind a few basic tips:
- Choose high-quality pictures. While you don’t necessarily need to hire a professional photographer, make sure the photos you purchase or take look professional. The subject of the photo should always be clear — no blurry images! — and the lighting should make the image easy to consume.
- Consider white space. White space is the empty space around the content of the graphic. So if you have a line of text or pie chart, you’ll want to include enough unused space around it for it to breathe. This helps people better digest the content of your graphic and understand its meaning.
- Include photos of people, when appropriate. Human beings are wired to respond to faces, and our attention naturally shifts towards them. Adding photos that include a friendly face can help people connect with you and your subject matter.
- Be selective with text and make it large enough. Your graphics shouldn’t include a ton of text, for a variety of reasons. Not only can lots of text on an image be difficult to read, it can be impossible for those with vision impairments — screen readers can’t look at a graphic to see what it says. So keep text to a minimum, make sure your font is large enough, and provide alternatives, like alt text, for accessibility purposes. Learn more about digital accessibility.
- Don’t get too complicated. Avoid adding tons of busy graphics that compete with one another and with the educational content of your courses. Remember, your images are there to grab attention, make things more engaging, and aid in the learning process. Sometimes, simple is the best strategy.
3. Appeal to a variety of learning styles
Everyone learns differently. In fact, there are a variety of learning styles, and if you want to engage as many students as possible, you’ll appeal to all of them whenever you can. Here are the four most common, and ways you can meet the needs of each type of learner:
- Read/write: These students learn most effectively through words. Include written instructions and information for them, either on the course pages themselves or as downloadable PDFs.
- Visual: Graphics, images, and videos are perfect for this style of learner. In fact, in one study, viewers remembered 95% of a message when watching a video, compared to just 10% when reading the information. Videos can be an incredibly powerful way of educating online.
- Auditory: These types of learners prefer to glean information by listening and speaking. So you might include videos of you explaining concepts that students can listen to. Or you could offer access to a podcast as part of your class, have a weekly Zoom call that opens up one-on-one discussion, or even incorporate songs into your teachings.
- Kinesthetic: These students are hands-on learners, and benefit from physically figuring things out themselves. While this might seem tricky to apply to online learning, get creative! Provide sewing patterns students can practice themselves, assign a list of photos they need to take for the week, or task learners with creating a logo themselves.
Let’s say you sell online cooking classes. If you wanted to speak to all four learning styles in one module, you might have several paragraphs on the principles of making bread rise, include an infographic demonstrating the science involved, feature a video of you demonstrating and discussing the principles aloud, and assign students the task of making their own loaf of bread.
4. Use a compelling narrator
When you’re filming videos for your courses, an effective narrator can make a world of difference. If you’re a fan of audiobooks, you probably understand this concept. A boring, flat voiceover can send listeners right to sleep, while someone who’s engaging and interesting has the opposite effect.
It’s important that your narration reflects the tone of your course. Is your topic fun and quirky? Serious and sensitive? Helpful and relatable? Your videos should reflect that.
Take the time to get the pace of your narration right as well. It can be easy to speed through your voiceovers, which can make it hard for your students to follow along. Listen back to your recordings and, if you’re speaking too fast, start over.
Finally, don’t try to mimic your favorite voiceover artist. You’re not going to sound like Morgan Freeman no matter how hard you try and that’s not what students are looking for. Just be yourself!
If you feel like this isn’t your strong suit, that’s okay. There are great professional voiceover artists available for hire that don’t cost an arm and a leg.
5. Include quizzes and polls
Quizzes and polls are an excellent way to see how much your students are absorbing, learn more about them, and engage them at a higher level. They also break up your content with something fun and different.
You could also start each module with a poll. You can ask questions that help you better educate students or even just encourage them to share something fun about themselves. What do they hope to learn from your course? What’s their biggest accounting pain point? What’s their favorite song? How many cakes have they baked?
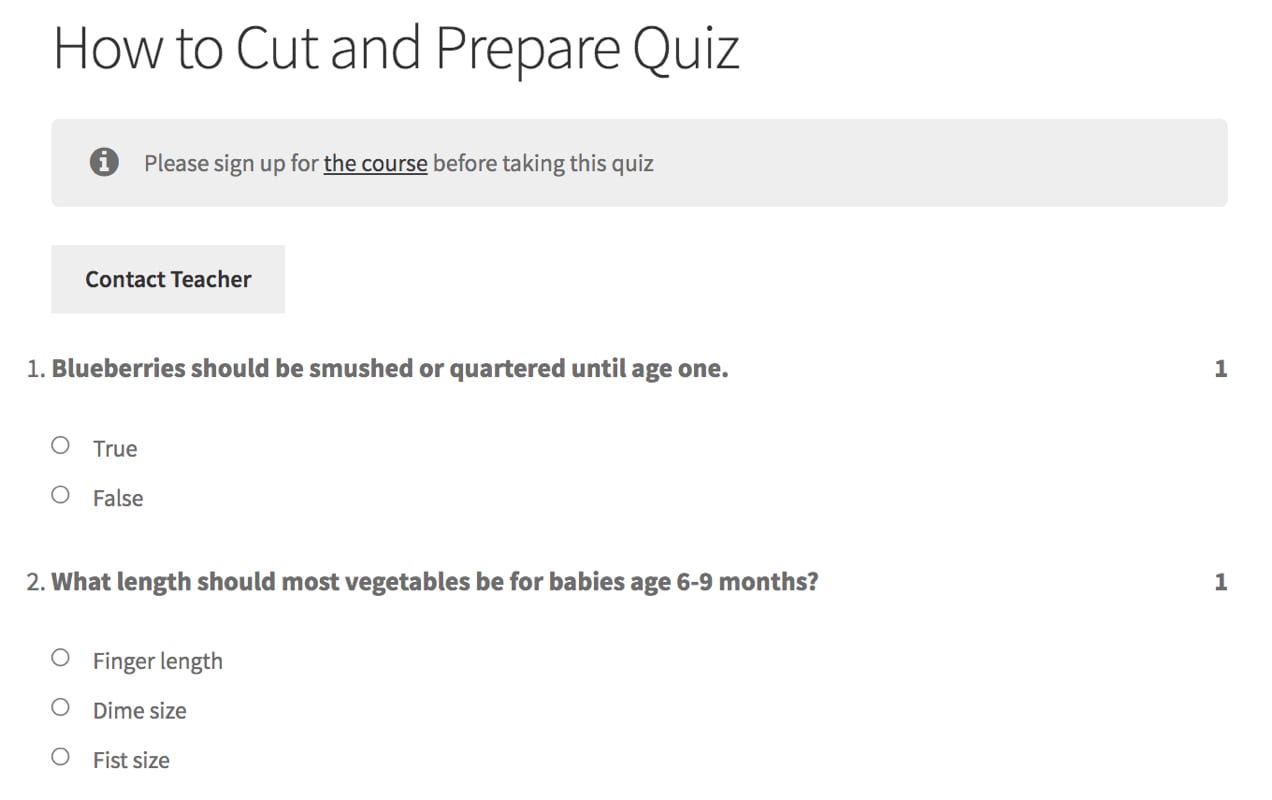
Then, mix in quizzes throughout your course. With Sensei LMS, quizzes are associated with lessons. So you can create questions based on the lesson that a student just completed. Mixing up question types — multiple choice, true/false, fill in the blank, short answer, etc. — can also keep things interesting.

You can set question types like multiple choice and true/false to be auto-graded, then manually grade open-ended questions yourself. This gives you the opportunity to find areas of improvement for your courses, and reach out to any students who might need a little extra help.
One of the biggest differences between online and physical learning environments is the community involved. Students who take online courses miss out on sitting next to other people taking the same class, discussing topics with them, and asking questions out loud.
You can create a similar environment with an online community, either on a social media platform like Facebook or by using a WordPress plugin like bbPress. You can either divide topics up by module or lesson, or base them off of student characteristics (like age of their children, location, or instrument they’re learning). These communities give students the opportunity to discuss topics with one another, brainstorm ideas, ask clarifying questions, or even build friendships that encourage them to keep learning.
7. Incorporate gamification
Gamification applies principles from game playing — like point scoring and competition — to other mediums, like online learning. This is a great place to get creative! Here are a few ideas:
- Add challenges and quizzes into your lessons
- Award points based on activities — completing tasks, scoring well on quizzes, etc. — with a prize for the student who earns the most
- Reward students who frequently engage in your forums with badges
- Add a progress bar to your courses to motivate students to finish a module
- Let students share their grades on social media
Incorporating gamification makes learning more fun and encourages healthy competition, making your courses more engaging for students.
8. Understand what your audience is looking for
The absolute most effective way to make your courses engaging for your students is to provide what they’re looking for. If you answer their questions and help them meet their goals, they’re more likely to finish your course, leave a good review, and recommend it to their friends and family members.
And that all starts with knowing your target audience. Sit down and get to know your students or the students you want to acquire. What are their pain points? What do they hope to learn? What are their goals? What is their learning style? How much time do they have? How much are they willing to spend online?
Then, adjust your course content and format as necessary to meet their expectations.
It’s all about your students
When it comes down to it, your online learners are at the heart of everything you create. And if you keep their needs in mind when crafting your course content and formatting your classes, you’ll be able to keep them engaged, interested, and buying more.
Want more tips? Check out this article from Sensei LMS about creating effective online courses.


